Moisture and ventilation are essential to proper construction.
Unfortunately, commercial and single family residential construction techniques have seen a change in recent years. Today, tightening the structures to prevent thermal leakage is a common practice. This can be attributed to the demand for energy efficiency. However, this change in the construction process has led to less air infiltration, which has contributed to moisture problems.
If preventitive measures aren't taken during the construction process to manage moisture, you may find yourself in a situation similar to the one detailed in this blog.
BACKGROUND:
When the decision was made to install an addition to their Ohio business in 2004, the owners neglected to include even the most basic steps for proper moisture management during the construction process.
15 years later, their negligence resulted in extensive (and costly) damage thanks to the inevitable effects of moisture.


1) MOLD
- To quote our blog from September...
"Where there is mold, there must also be moisture."
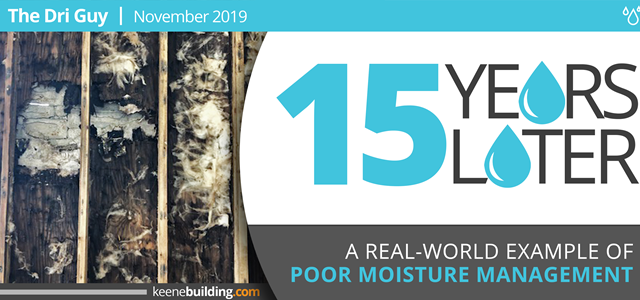
A Water-Resistive Barrier (WRB) is a material installed between the sheathing and the siding. It is designed to prevent water from reaching building components that could be damaged by moisture. Without a WRB, sheathing and other parts of the wall assembly would be much more susceptible to damage.
In this situation, there was no WRB installed between the sheathing and the lath, which led to severe mold growth and structural rot.

The best practice for preventing this situation is to adopt a mold resistance strategy that involves using the right products, understanding the application process, and maintaining regular job site management.
When looking for the right products to use for moisture control, a great place to start would be with Keene’s Driwall™ Membrane.
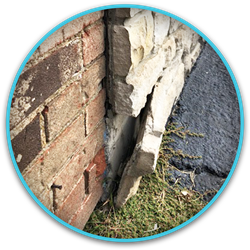
2) WEEPING
- Weeps are defined as openings placed in mortar joints of facing material at the level of flashing to allow moisture to escape. In other words, they allow the exit of any liquid water that drained down to the top surface of a flashing from the masonry wall’s core or cavity.
In this situation, moisture is entering the wall system with no way to weep the wall. After multiple freeze/thaw cycles, or periods where the temperature fluctuates between above & below freezing (32°F), that built-up moisture has forced the wall to pull away from the substrate.
Proper moisture management for masonry assemblies involves more than just knowledge of weeps. In devising the best approach, dividing the envelope into moisture management zones is crucial. These ‘separations’ are determined by factors such as the building site and climate, the structure itself (i.e. multistory versus low and sprawling), and the materials specified for the envelope.
The process of determining moisture management zones begins at any part of the exterior envelope. In most cases, since moisture moves from a high point of entry to a low point in the exterior building envelope, starting at the top makes sense.
Once these zones have been defined, the next step is to install a product that will allow even space between bricks and ensure drainage of the masonry cavity. For this, I recommend Keene’s Driwall™ Weep Vents.
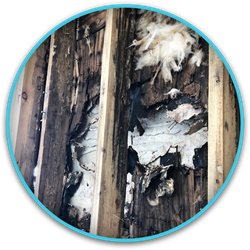
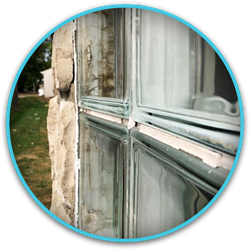
3) FLASHING
- Window flashing is a thin continuous piece of material that is installed to prevent water from getting into a structure from an angle or joint near windows. Window flashing is important because it is the only way to prevent water intrusion. A good seal guides water around the opening and keeps the interior wall protected and dry.
In this situation, the lack of flashing around the windows allowed for extensive leaking that resulted in severe deterioration of the interior walls.
When properly installed, window flashing will control almost all water intrusion into the structure and will work for the life of the structure. For the best results, I recommend using rolls of KeeneFlash 100.
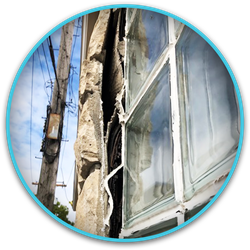
4) SEALANT & BACKER ROD
- A backer rod is a cylindrical type of foam used to fill cracks and gaps between building materials. The rod is used to ensure that the depth to be filled by the sealant is half the width of the gap to be filled. They also have bond breaking properties, preventing them from forming a bond with the sealant. Instead, they ensure that the sealant only bonds with the building material, thus preventing triple bonding.
When a backer rod and sealant are not properly installed (as seen in this situation), water can seep into your window cracks and warp/damage the surrounding frames. Once this happens, the cracks may deepen, which can lead to extensive water damage.
In addition to keeping precious air inside, properly sealing your windows will keep moisture and water outside. For the best seal around your window, go with KeeneSeal 100.

5) LATH
- Lath is any material fastened to the structural members of a building to provide a base for plaster. They can be made of wood, metal, gypsum, or insulated board. In older residential buildings, narrow wood strips were generally used.
Lath is typically the first step in the stucco process because it acts as the "framework" for the cement to adhere to. In this situation, the exclusion of a lath may have weakened the adhesion between the brick and masonry, eventually causing the stone to detach.
While many in the industry turn to a self-furred metal lath in their builds, Keene offers a lighter and easier-to-install alternative with its KeedeLath™